Mazda 3 Climate Control Knobs Upgraded

Mazda 3 HVAC Knobs Upgrade

A cheap (under twenty bucks) and easy (ten minutes, DIY) modification to the Mazda 3 involves replacing the plain black plastic knobs of the climate controls at the bottom of the dashboard with more substantial tuner-style ones that also sport silver aluminum trim. These are the three knobs that control the blower speed, direction, and temperature, sometimes called HVAC.

Mazda 3 A/C Knobs Compared

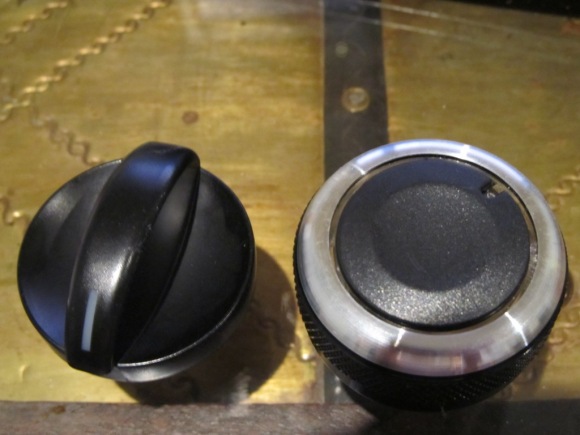
A comparison between the original OEM HVAC knobs (left) and the aftermarket replacement (at right).

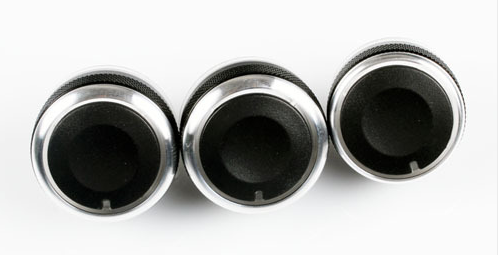
Searching eBay for “mazda 3 knobs a/c” will turn up a dozen purchasing options from China for around $15 with free shipping.  This was the route we took, and the product we received came as pictured within a few weeks. Those who want to buy North American can get the same item from autolismo for around $40.

Installation in its simplest form (shown here for  2003-09 models)  involves first pulling the original knobs straight out with by hand or with a pair of pliers (If you want to preserve the original knobs without damage, wrap the jaws of the pliers with duct tape beforehand). Then, simply push in the replacements; they will only fit one way, so there’s no risk of making a mistake. The only problem is that in second-generation 3s, the backlighting will come through at night with a bright whitish or light blue color that doesn’t match the rest of the dash lighting, which is red (or a bright blue when the stereo is on).

Mazda 3 Knobs Backlit White

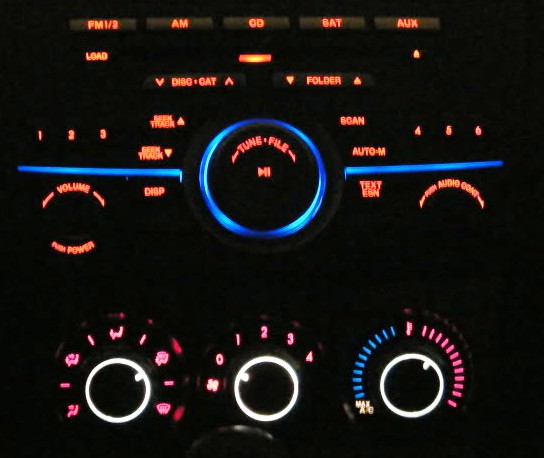
In 2010+ Mazda 3s, the HVAC knobs will be back-lit white unless we do something about it.

This is not an issue in the previous generation, as the plastic under the knob is red in earlier 3s whereas it is no longer. The solution for we perfectionists who insist on color-matching? Pick up some transparent red vinyl film from rvinyl.com. This can be used inside the knob, so the light that passes through will be filtered red.

First, trace the shape of the replacement knob onto the film and cut it out a little smaller than the outline. It doesn’t have to be a perfect circle. Then, use a hole punch and punch multiple holes near the center of the film to slip it over the stem of the knob.

Red vinyl film   Punched film

Peel the adhesive and pass it over the stem to cover the inside recess of the knob. If it doesn’t cover the entire inside area, cut another slightly larger circle and reapply, or just patch the exposed area with little bits of film.

If we stop at this point, the light that passes through the outer ring of the knob will be red, but the notch that indicates where the dial is pointing will still be clear, as that light shines through the stem of the knob. The solution is thus to cut a rectangle of red vinyl film and wrap it around the stem like so:

Wrap the stem with red vinyl Red Vinyl Inside

Press into place, and it’s done, backlit in a matching red.

Masda 3 Climate Red Control Knobs Upgraded

This is an interior customization that delivers good bang for the buck. The upgraded appearance is achieved cheaply and quickly.

Mazda 3 Climate Controls Before and After

Before (at top) and After (below)

Tagged , , , , , ,

Autoexe Leather Steering Wheel Wrap

Several of our recent posts have focused on leather to the point that we appear to have a fetish with the material. I’d like to say that this is just because we are leatherizing our Mazda 3 interior, though we do also wear a lot of dead cow in the form of coats, jackets, and shoes. Hmm…

In the aim of completing the process (following leather seat covers and shift knob), we needed to get a leather wrap on our steering wheel, especially since our previous car, a defunct Toyota Matrix, included it stock despite having cloth seats. Wheelskins is a popular and inexpensive ($69) option but one that is often ripped for its poor aesthetics (“looks ugly IMO,” “I would rate it about 4/10.”)  in Mazda forums, probably on account of the wide, thick stitching that appears over the wheel spokes.

The big stitches on Wheelskins leather

A recommended yet (obscenely) expensive option is an Autoexe wheel wrap custom made for the Mazda 3 at $215, as much as a decent leather jacket. Wanting to do it right, we splurged and picked one up from Streetunit during a Black Friday sale—something like 5% off with usual free shipping.

Autoexe Steering Wheel Wrap Kit from Streetunit

Autoexe Steering Wheel Wrap Kit from Streetunit

The Autoexe Leather Wheel Cover before stitching

The Autoexe Leather Wheel Cover before stitching

Despite statements (again in aforementioned Mazda forums) that installation was a bear, often taking 4-6 hours or longer, it will not nearly be that bad, unless you have little dexterity or fingers like sausages (no offense to those who took that long!), even with only Japanese instructions that include not-very-useful photos. We initially made an effort to scan the Japanese text, then convert it to text with free OCR software, then plug it into Google Translate, but this led to meaningless gibberish such as “After tumor removal stipules re of body. The test with Kinuta -7 to both sides of the bend with Ri / Samuvu. And go to step 7.” Yeah. Sure…

We were not dissuaded though, since the kit includes ample thread and enough 3M double-sided tape for five or more installations, so we boldly set out to wing it. The female half of our tandem did the stitching and gluing after the male half had muscled the wrap around the wheel and centered it, and she finished in two hours: one hour for the top half and one hour more for both bottom quarters. Some keys to success are as follows:

INSTRUCTIONS:

First, use double-sided tape to glue on the two pieces of plastic from the kit a few inches above the left and right spokes. These form bulges that are supposed to enhance the driver’s grip. Where they go can be seen from the shape of the leather.

3M Doublesided Tape on wheel grips (+ Japanese instructions)

3M double-sided tape on plastic wheel grips/bulgy things (+ Japanese instructions)

Cut the thread to make it just long enough to finish the top half of the wheel with some excess; knot the bottom end of the thread and let the top head hang a few inches through the eye of the sharp needle (the kit provides one blunt and one sharp). Pass the needle through the leather directly above the left spoke to make several loops, essentially creating knots.

Tying off the start and ends.

Tying off the starting and end points.

Then, switch to the blunt needle and pass it through the pre-made stitches on both the front and back halves of the wheel wrap starting from above the left spoke and continuing around the top to directly above the right spoke.

Stitching

Pull the thread taut to close the wrap around the wheel as you stitch. Make sure the thread doesn’t catch or knot up and don’t pull too hard—you don’t need to and don’t want to break the thread. For ease of finishing, turn the car on and rotate the steering wheel upside down. Switch to the sharp needle and again make loops as you did at the start to knot off the end above the right spoke.

Repeat the process to do the bottom left quarter from below the left spoke to the center spoke. Then repeat again from the center spoke to below the right spoke. You’re essentially doing the stitching in three parts: top half of wheel, bottom left, bottom right. Finally, apply double-sided tape to the spokes and glue down the leather flaps that cover them.

PROBLEMS:

We found that while the bottom spoke was covered nicely, the flaps covering the left and right spoke overlapped the on-wheel controls. A solution is then to use a sharp pair of scissors (we used a thin-bladed pair meant for haircutting) to cut the leather to follow the curve of the trim. We taped the bottom edge of the scissors to prevent scratching the plastic of the spoke, but the end result was a bit jagged looking. This seems to be a shortcoming of the product should you have any on-wheel controls. Perhaps we should have removed the trim covering the spokes and tucked the leather flaps underneath, though doing so requires removing the airbag and taking apart the wheel. As it is too late, barring buying another kit, we will have to live with the imperfect result.

Autoexe Black Leather Steering Wheel Wrap

Done, but with on-wheel controls covered.

Controls uncovered but cut leather at spokes looks jagged.

Controls uncovered but cut leather at spokes looks a bit jagged.

Et voila…a charcoal, I mean, black… leather wrapped wheel. Yes, it’s supposed to be black but clearly doesn’t resemble the dark and shiny black of the leather seats or the shifter. This seems to be another flaw of the item. To create a glossy dark black finish, we needed to dye the leather using Doc Bailey’s Leather Black.

Doc Bailey's Leather Black

The end result is an obviously meatier wheel that feels good in your hands and one that makes long road trips friendlier on fingers and wrist.

Tell us whether you would be interested in installing a wrap like this or share your experiences if you already have one by commenting on this post.

Tagged , , , ,

Featured Blue Mazda 3 Owner: Frieda

Frieda is proud of her 2010 blue Mazda 3 hatch, the only brightly colored car on a block lined with silver and black vehicles. As her custom license plate shows, she likes to stand out, to be different, a uniqueness she expressed when she asked the dealership not to sell any more celestial blue mica models after she bought hers. Frieda also loves the functionality of her hatch (a must-have feature for her), great for summer golf outings and runs to Costco. The adjustable power driver’s seat was also a necessity in a household where there is nearly a foot of height difference between drivers. The leather seats that came with the power seats are not a big deal to her (she prefers cloth), but seat heaters keep them warm in winter; for blistering summer days, however, Frieda packs a seat towel. Clearly like the other “3” owners we have featured, Frieda combines personality and practicality.

Friedas3

Tagged

Installing a Leather Interior, Part 2

There is a reason why Mazda and other car manufacturers rarely, if ever, show their vehicles with a cloth interior in their brochures.

Cloth vs. Leather: A Picture is Worth 1000 Words

Leather lends a sharp, luxury look, which is why we ultimately succumbed and purchased a complete set of front and rear seats from an auto salvager on eBay. We picked up ourselves, and it was a fun trip. Schram has miles of aisles each with floor-to-ceiling shelves full of bagged auto parts. The seats looked good (a few dimples and scuffs), at least in a fluorescent-lit storeroom, and we felt a sense of achievement in our ability to fit everything into the back of our Mazda 3. Later on, when we were cleaning off the surfaces at home we did notice what seemed some dried blood on the passenger seat, which was kind of creepy. Did the previous owner die in the seat? What happened? The passenger side airbag had not discharged or the leather would’ve been torn open; was it something mundane like someone who was not wearing a seatbelt banging their head on the windshield during an accident or something more colorful, like a drive by shooting in the Detroit area? There were no bullet holes, though the location of the blood could’ve resulted from someone being shot through the driver’s side window and slumping sideways onto the passenger seat.  Maybe we watch too much CSI.

Using instructions compiled from several online sources (none of which indicated what size socket was needed to remove the seat bolts—14mm, by the way) and armed with the invaluable 3000+ page Workshop Manual, we were able to remove and replace the rear bench. Taking out the rear cushion is really just a matter of yanking it out vertically with some force, and replacing the back a matter of unbolting (the first turn is the hardest) and not scratching up the interior or sill paint when passing the bench in and out the door. The front seats, however, were another matter.

As noted in Part 1, we had hoped that there would be a connector available to enable the 8-way power seats and maybe even heated seats, given that, as far as we know, all 8-way seats come with the heat in them. Unfortunately, we found out during the install at the dealership that the connector beneath the seat was quite specialized and there would be no way to draw power. Moreover, the airbags that were supposed to be in the leather seats were actually not there, and the dealer refused to install them that way for legal and ethical reasons (which we agreed with). They didn’t seem keen on swapping our airbags in either.* So to get things done the same day, we settled for having the front seat covers replaced—no power controls or heat but at least leather skins instead of cloth. They look great, especially when lit up at night, and especially after several applications of Lexol leather cleaner and conditioner to bring out the shine and oil the finish. A little bit of Doc Bailey’s Leather Black helped as well to cover any scuffs.

Lexol Leather Care KitDoc Bailey's Leather Black

We already got a Mazda 6 leather-covered shift knob to replace the plastic one. Next up to complete the leather interior: an Autoexe leather steering wheel wrap and a Redline center console padded leather cover.

*On a site note, when we contacted Schram about the missing airbags, they were apologetic and happy to discount the leather seats. So we ended up getting the full interior for $149 plus the installation cost at the dealer. Not bad for factory leather!

Tagged , , , , , , ,

Installing a Leather Interior, Part 1

A complete set of leather seats from a 2010 Mazda 3, front and rear, became available on eBay recently for cheap ($349) at Schram Auto within driving distance where we could pick them up.

Custom leather seat covers, by Katzkin, would run more than $1500 installed with tax;  these OEM seats, gleaned from a wreck, were a quarter of that and would also add “eight-way power adjustment” to the driver’s seat, so they raised an immediate temptation. This led to several days of obsessive research, hand-wringing and asking “should we or shouldn’t we?”

Their availability raised obsessive and incessant debate over several days on whether was whether we really wanted leather. Online debates on the subject, like other great philosophical questions, such as whether one can prove that God exists, are endless with no clear winner. Leather provides a luxury look; since we are also people whose outerwear is almost entirely comprised of leather and who appreciate “the finer things,” this made us good candidates for a leather interior. Leather is possibly easier to clean (and we are pigs when eating in the car) though it needs care and conditioning to keep it that way; plus, there are horror stories online related to the difficulty of removing blood and other stains from leather seats.

Hot Leather Seats

Yet, leather is scorching hot in the summer and freezing cold in the winter. Given the extreme summers we have been having and the typical northern winter where we live, the latter issues are an important consideration. That and the fact that my wife likes to wear skirts all year long, thus exposing her fairly unprotected legs to the upholstery. And if we go with leather, we would also need a quality leather-covered shift knob and steering wheel to keep the look uniform, which are also not easy to find.

Wheelskins makes a leather steering wheel wrap, but it is only semi-custom and doesn’t account for the spokes, which results in a look that many find less than appealing.  Trying to find a leather-covered Mazda 3 shift knob for an automatic transmission was also difficult. However, some digging turned up two products that saved the day. Autoexe makes a by-all-accounts beautiful (albeit costly) custom leather wrap that wraps the spokes nicely. And, online discussion noted that the Mazda 6 knob (which is widely available on eBay) has the same threading as the 3.  With this possibilities available to us, we were ultimately sold on the idea that it was somehow destiny that we saw these seats on eBay, and the process of installing them began.

Part 2 details the end result.

Tagged , , , ,

A Leather-Wrapped Shift Knob for the Mazda 3

Before buying OEM leather seat covers (or seat “skins,” since the cloth was removed and the leather placed directly on the seat foam), we were actively looking for a replacement shifter to match the leather look. We didn’t want leather seats and a plastic shift knob. This was harder than we thought, since most leather shifters sold for the Mazda 3 on eBay are designed for manual sticks, and the screw threading may not match. We were ultimately saved from a fruitless search by a posting from mazdageorge on torontomazda3 indicating that a Mazda 6 shift knob, which is common on eBay, has the same threading as a second-gen “3.” We scored one for around $30, and it both looks good and feels more substantial those few times when someone driving an automatic needs to shift.

Mazda 6 Shift Knob fits a Mazda 3 shift_knob_2

On those occasions (park-reverse-drive), the leather-wrapped shift knob in combination with the stepped shifter plate gives us a small taste of what driving a manual transmission feels like.

Tagged , , ,

No Mazdas in Manhattan?

We returned to Manhattan for a five-day visit in October 2012 (and got out the day before “Superstorm” Sandy hit, but that’s another story). Since this was our first trip there since buying our Mazda 3, we were on the lookout for any others on the streets of the city, perhaps to see whether New Yorkers had customized their rides in their inimitable style. Imagine our surprise at the extreme rarity of Mazdas in Manhattan. In the five days we were there we covered most of the borough from the Upper East Side to the Lower East Side, riding in taxis and buses as well as walking, always with an eye out, and saw only a pair of Mazdas (both 3s)!  One, a white hatchback, was parked in Chelsea and the other, a silver sedan, passed us as we stood waiting for a bus on 2nd Avenue and 34th Street. In a borough full of Toyotas, Lexuses, Nissans, and almost every other popular make, where were the Mazdas?

Is there a Mazda in this mess?

On our day of departure, we drove in Queens and through Nassau and Suffolk counties on Long Island and saw perhaps a few dozen Mazdas, but for whatever reason, Mazda is not popular in Manhattan.

Tagged ,

Mazda Personalization Options (They’re in the Manual)

If you read your Owner’s Manual, there should be a section on personalization features. The term may be used liberally, as the personalization is limited and must be done at the dealership. Some examples are if you want to change the language of the displays or not having the interior lights turn on when the key is removed from the ignition. We’ve chosen to make three changes, which was free in combination with other service we had done at the dealership.

1) We reduced the time that the interior lights stay on when the door or doors are left ajar from 30 to 10 minutes. We can’t imagine being in a situation where we will need the lights for that long. Why drain the battery?

2) We chose to have all four doors open with one press of the remote. It’s a hassle to hit the button twice to open the passenger door or the hatch, especially when carrying groceries. I never seem to get the timing right and often end up hitting the button repeatedly and frantically.

3) We chose to have all doors unlock, not just the driver’s door, when the car is in park. We’ve been at customs inspection at the Canada-US border and had to open the hatch only to go through a struggle under stress to figure out why the power hatch button wouldn’t work. “Are you sure this is your car?” the guard asked.

To avoid possibilities of a strip search, we decided it best to pursue these personalization options.

Tagged , , ,

Featured Blue Mazda 3 Owner: Sherri

Whenever we see a blue Mazda 3, we do our best to get hold of the owner and do a quick interview to find out who comprises this “neighborhood” of the Mazda nation.  Here’s our first sighting…

As an RBC mutual funds representative, Sherri Wright knows a thing or two about smart investments; that’s why she owns a 2010 celestial blue Mazda 3 hatchback with the moonroof package. Her choice was a practical one as she was drawn to the car’s reputation for reliability, though she admits the color was a definite attraction. Working in a busy mall area, her 3 has gotten its share of door dings, and living on a particularly icy street, she’s had a neighbor slide into the rear of her vehicle, but now the car looks as good as new. Mazda 3 lovers in the London, Ontario area, feel free to contact Sherri for your investment needs at sherri.wright@rbc.com or call 1-800-769-2511.

Tagged

Mazdagear

When it comes to buying OEM accessories for our Mazda 3, we go first to Mazdagear.com. Essentially the Parts department of Morrie’s Mazda in Minnetonka, MN but promoted under the sexier, more web-friendly name of Mazda Gear, they have the best prices we’ve found. For example, our first “mods,” a set of all-weather mats, cargo tray, and chrome “Zoom Zoom” license plate frame ran just over $250 with fast shipping.

The local dealership price was nearly double that, not including sales tax. Ebay prices often end up higher as well once outlandish shipping costs are factored in. And, they answer questions on the phone or by email and have an easy return policy, which we used when we accidentally picked up a brushed aluminum license plate frame instead of a polished chrome. MazdaGear isn’t a sponsor of our blog, nor do we get special treatment there, but we’re pleased to give them a shout-out for their prices and excellent customer service.

Tagged , , ,